
Online Learning Agreement for outgoing exchange students
On this page, you will learn how to create an Online Learning Agreement (OLA) in SoleMove.
Note that you can only create an OLA if you have been nominated for an Erasmus+ exchange and have confirmed your seat in SoleMove.
Below you will find detailed instructions and helpful images to guide you through each step of the process. You can enlarge the images by clicking on them. They will open in a new tab.
Click on any of the steps below for more information:
Create and complete your OLA
It is recommended that you use the Chrome, Firefox or Opera web browser to create your OLA in SoleMove.
This is how you log in and start your OLA:
- Go to solemove.lu.se.
- Log in with your student account.
- Under ‘My applications’, open the application with 'Confirmed' status to your ERASMUS destination by clicking on the ‘Edit’ icon.

Follow these steps to create an OLA:
- Click on the ‘Create learning agreement’ button on the top right of your application.
- You will see a confirmation that the Learning agreement has been created.
- Access your 'Learning agreements' from the left menu.
The instructions continue below the image.


The next thing you need to do is to click on the 'Edit' icon to start filling in your OLA.

You will see that some of your personal details and information about your studies at Lund University are pre-populated under 'Personal data' and 'Home institution information'. This information is taken from your exchange application in SoleMove. Make sure that this information is correct. If not, contact your faculty’s international coordinator for help.
The instructions continue below the image.

Follow these steps to complete your Learning Agreement:
- Enter your faculty/department at Lund University.
- If needed, change the ‘Language knowledge’ to the language of instruction at the receiving institution. It is usually English.
- EU subject area can also be changed if needed.
- Enter the name and email address of your coordinator at Lund University under 'Responsible person at the sending institution' or as instructed by your faculty. The phone number is optional. If you add it, it must be in the international format, without spaces, e.g. +46462223344.

Next, you will need to fill in the details of your exchange in the 'Exchange information' section. Follow these steps:
- Change the planned start and end dates of your exchange to those given by your host university. Do not use the dates already given (these are the start and end dates of the semester in Lund).
- Enter the faculty/department where you will be studying. If you don't know, check the name of your host institution in SoleMove. If no faculty is indicated, just write the name of the university, and select the mobility type 'Semester(s)'.
- Check the information provided by your host institution as to who is your contact person or person responsible for the OLA.
- Enter this information in the section 'Responsible person at the receiving institution'. The phone number is optional. If you add it, it must be in the international format, without spaces, e.g. +31104082266.
- Click on the 'Save' button to display the course section of the OLA.

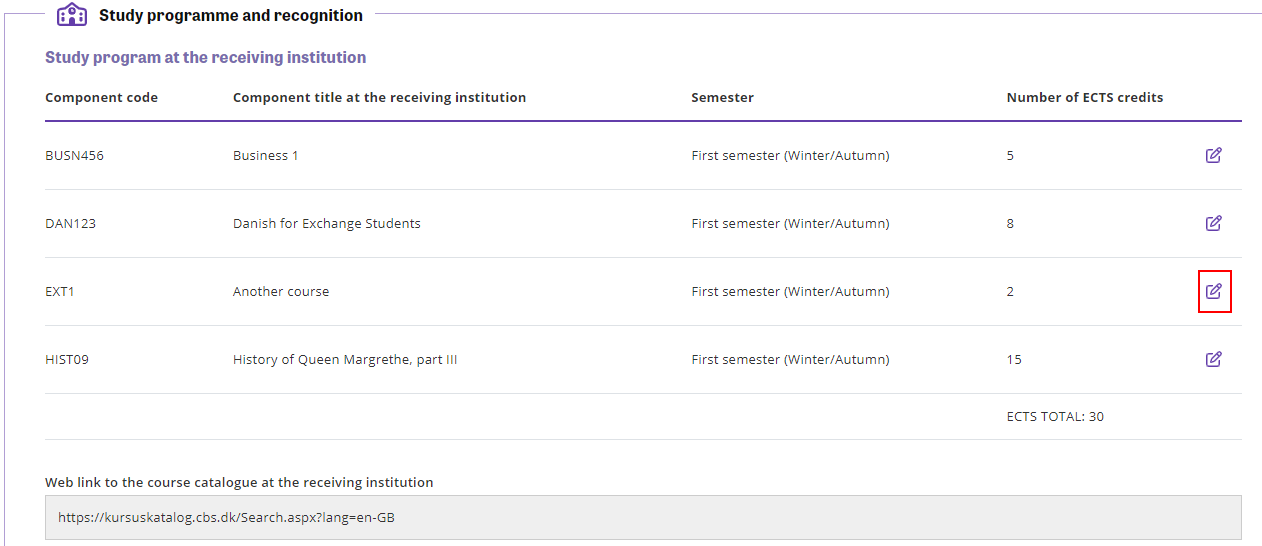
You will now need to list all the courses you intend to take at your host university, in the section 'Study programme and recognition'. Follow these steps:
- Click on the '+ Add new' button to start adding courses.
- Enter the course code ('component code') for each course. If not available, just use a space or write 'n/a' as this field is not optional.
- Enter the title of the course ('component title').
- Select the correct semester. The 'First semester' is the autumn semester at Lund and the 'Second semester' is the spring semester at Lund.
- Enter the number of ECTS credits.
- Click on the 'Save' button.
- Click on '+ Add new' again to add more courses and repeat the process until the list is complete.
The instructions continue below the image.

List all the courses you plan to take at your host university on this page.

You should now complete the section 'Recognition at the sending institution'. If you have been instructed by your faculty to use 'Mobility Window' as a component title (i.e. you are allowed to take optional/elective courses during your exchange), follow these steps:
- Click on the ’Edit’ icon.
- Enter 'N/A' under 'Component code'
- Enter 'Mobility Window' as the component title.
- Enter '30' under 'Number of ECTS credits'.

Submit your OLA
To submit your OLA, follow these steps:
- Click on the 'Confirm' button. A confirmation prompt will appear.
- Click on 'Confirm' in the confirmation prompt. The 'Commitment of the three parties' section will appear, showing your approval signature and timestamp.
The instructions continue below the images.


Once your OLA has been submitted and approved by your coordinator at Lund University, it will be sent to the host university ('receiving institution') for evaluation and signature. When all three parties (you, Lund University and the host institution) have approved the OLA, you will see the approval signatures and timestamps at the bottom of your OLA. Your OLA is then complete.

Note that some host universities are not yet able to receive and manage digital OLAs. This is due to delays in the implementation of Erasmus Without Paper (EWP). You may therefore need to download a PDF version of your OLA and send it to your host university for approval. Click on the PDF icon to do this.
A signed copy of the PDF version must be submitted to your home faculty according to their instructions.
Change your OLA if necessary
If you wish to make changes in your OLA after you have submitted it and before it has been approved, follow these steps:
- Click on the 'Unlock' button. A confirmation prompt will appear.
- Click on 'Unlock' in the confirmation prompt. This will reset the OLA's status – any changes will need to be signed by your faculty before being sent to the host university.
The instructions continue below the image.

To edit an already submitted course, for example by changing the component code or title (i.e. the course code or title), the semester or the number of ECTS credits, follow these steps:
- Click on the ’Edit’ icon. The course will open up.
- Edit the information as required.
- Click on 'Save'.
The instructions continue below the image.
Resubmit the OLA to your coordinator for approval by clicking on the 'Confirm' button again.
Your coordinator may post a comment on your OLA. You will be notified by email if this happens.

It is likely that the OLA you submit before you start your exchange will need to be changed during your exchange for a variety of reasons. A course may no longer be offered, there may be a clash in the timetables of two courses, etc.
To make changes after your OLA has been approved (see step 6 above to see what this looks like in the system), follow the steps below.
- Click on the 'Unlock' button.
- Scroll down to the section 'Changes to the Learning Agreement'.
- Click on '+ Add new' to add a course to your study plan or remove a course from your study plan.
- Go to 'Component status' and choose 'Added' or 'Deleted' depending on what you want to do with the course.
- Go to 'Reason' and add a reason for adding or removing the course. There are four reasons for each status. Contact your coordinator at Lund University if you are not sure which one to choose.
- Enter the number of ECTS credits for the course. Make the number of ECTS negative if you want to delete a course, so that the total number of ECTS credits in your study plan reflects the courses you plan to take.
- Resubmit the OLA when you have made all your changes. It will go through the same approval process as before each time changes are made (i.e. student → coordinator at Lund University → coordinator at the host university).
Note that you can also change the recognition at the sending institution. However, this is less likely as most students will have written 'Mobility Window', '30 ECTS' in the recognition section.

Once your OLA is complete, you can review it by downloading a PDF copy. To do this, click on the PDF icon. Save a copy for future reference, as some universities may require you to submit a PDF copy in their application system.

Contact information
Questions about your OLA
Contact your faculty coordinator
Technical issues with SoleMove
Contact solemove [at] er [dot] lu [dot] se (solemove[at]er[dot]lu[dot]se)