Application guide for incoming exchange students
On this page, you will learn how to create and submit an exchange application in the SoleMove application system.
Before you start your application
There are a few things you need to think about before you start your application, depending partly on whether you will be spending a semester or a full academic year (two semesters) at Lund University.
As an exchange student, you are expected to study full-time, i.e. 30 ECTS credits per semester. You also have the option of increasing your course load by taking Swedish language courses in addition to your general course selection, see below.
Note that full-time study is a prerequisite for obtaining a residence permit from the Swedish Migration Agency.
Lund University offers more than 700 courses suitable for exchange students, in a wide range of subject areas. You should add all courses you want to apply for at Lund University in your ‘Proposed study plan’ in SoleMove. Go to the page below to find links to all available courses.
Read the course descriptions for all the courses you are interested in and remember to check the entry requirements to see if you are eligible.
During the application process, you will be asked to list your 'main courses' and 'alternative courses'.
If you are nominated for a full academic year, you will need to submit two applications at different times: one for your first semester courses and one for your second semester courses. You will receive instructions before the next application period.
Below you will find both detailed instructions and helpful images to guide you through each step of the application process. You can enlarge the images by clicking on them. They will open in a new tab.
Click on any of the steps below for more information:
Start your application
It is recommended that you use the Chrome, Firefox or Opera web browser on a computer to submit your application in SoleMove.
This is how you log in and start your application:
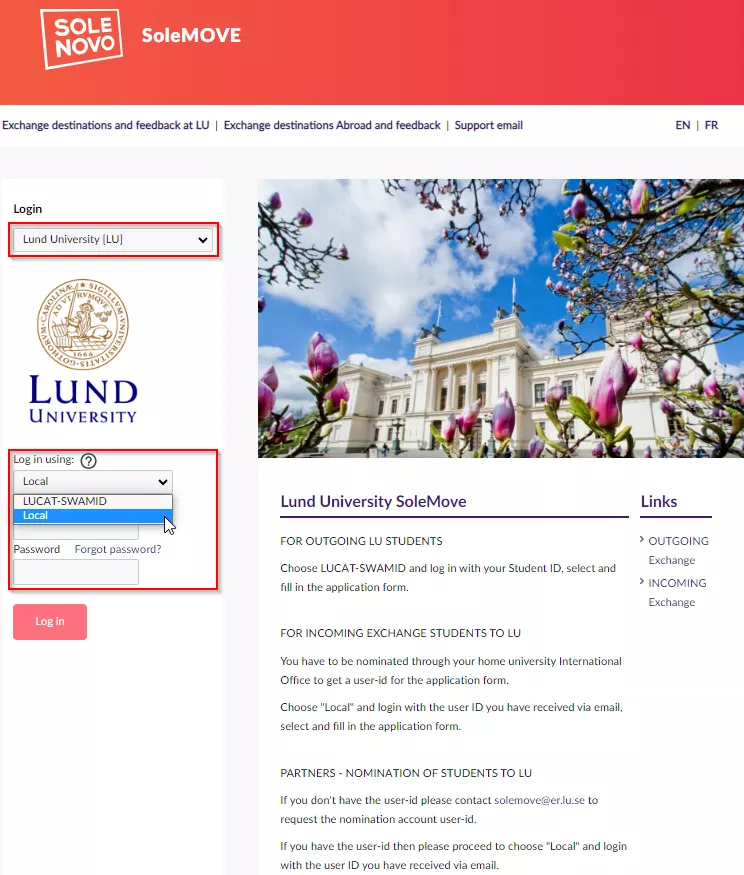
- Go to solemove.lu.se.
- Select 'Lund University [LU]' from the drop-down list under 'Login'.
- Select 'Local' from the drop-down list under 'Log in using'.
- Log in with the user ID you have received by email. Note that you will need to choose a password and activate your account before you can log in. Save your password for future reference.
- Give your consent to the processing of your personal data (in accordance with GDPR) when you log in for the first time. Once you have given your consent, you can start your application.
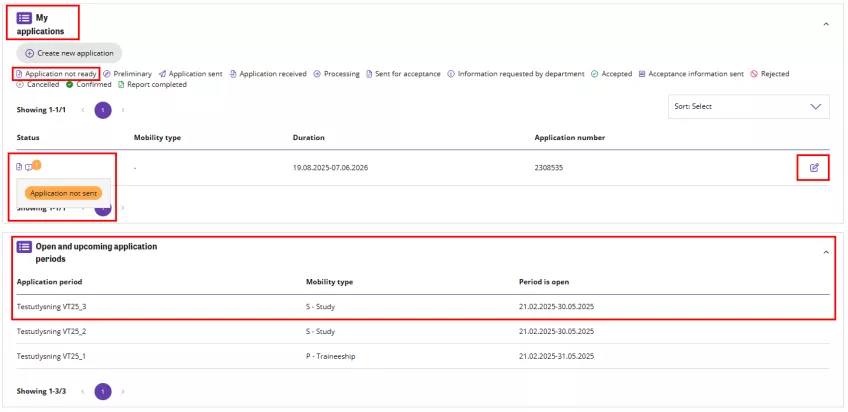
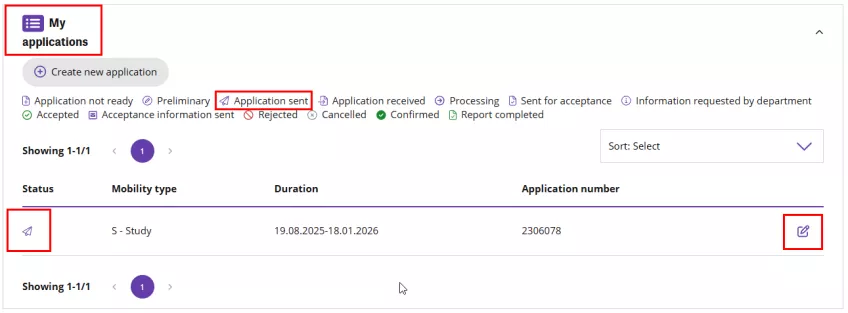
You will see that a ‘normal’ application has automatically been created for you in the ‘My applications’ section with an orange message stating ‘Application not sent’ that you need to edit:
- Click on the 'Edit' button to the far right to access the application form.
The instructions continue below the image.
Next, you need to:
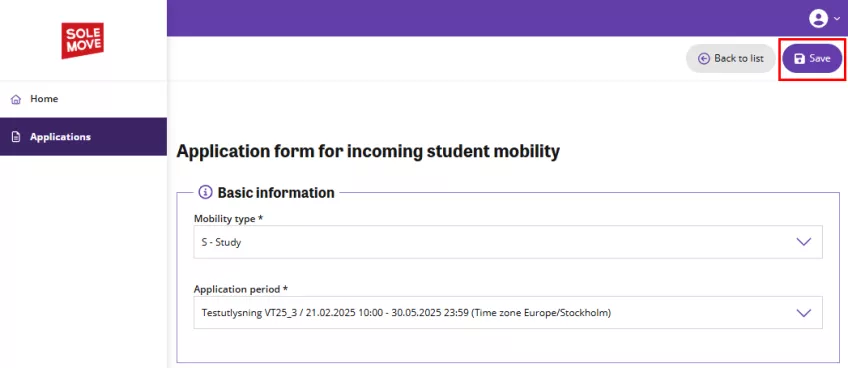
- Select 'S – Study' from the drop-down list under 'Mobility type', unless you have been told otherwise. This is important.
Select the correct application period. The system displays available options based on the selected application type and the mobility type.
Note: You can only apply during the dates the application period is open. On your landing page you can see the open and upcoming application periods with their respective dates.
- Click on the 'Save' button.
Complete your application
You are now ready to start your application.
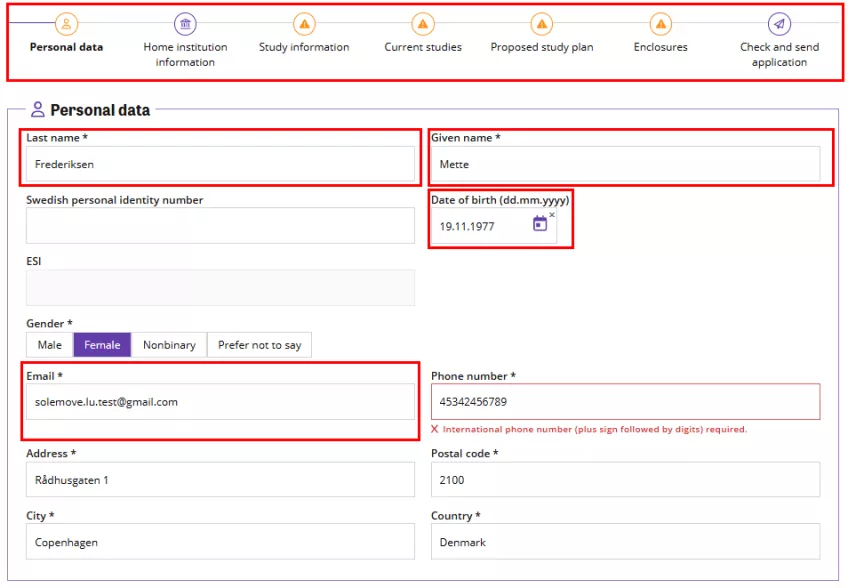
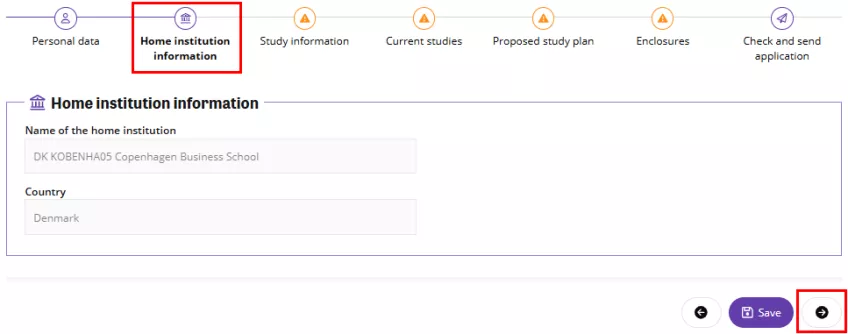
The application form is divided into tabs. You can navigate the form by selecting icons at the top or using the next and previous buttons at the bottom of the page.
Note that you should always save changes before you leave the tab.
Compulsory fields are marked with an asterisk*. After you have saved the information, the system informs you if any compulsory data is missing. You can only submit your application if all compulsory information is set. The tab’s icon is a notification icon if compulsory data is missing, or your attention is needed.
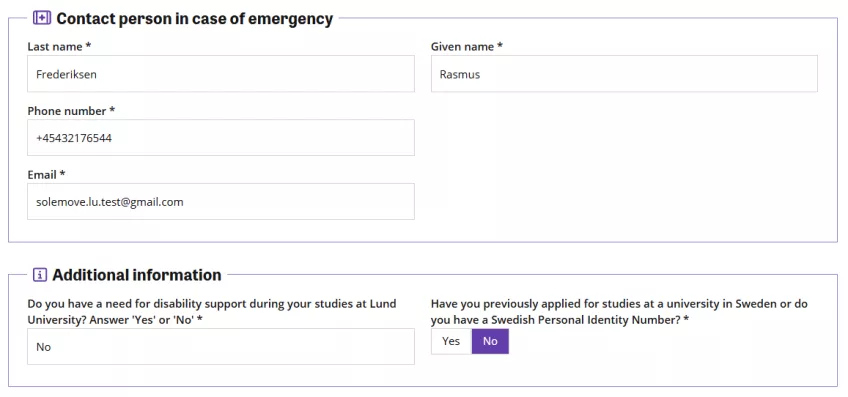
In the 'Personal data' tab, you will see that some data has already been filled in by your home university during nomination, e.g. 'Last name, First name, 'Date of birth' and 'Email'.
Follow these steps:
- Check that the pre-populated information is correct. Update if necessary.
- Enter your remaining details. All telephone numbers must be in the international format, without spaces, e.g. +44701234567.
- Under Additional information, indicate whether you have a need for disability support or not.
- Also indicate whether you have previously applied for studies in Sweden or not. If the answer is ‘Yes’, you should already have a temporary personal identity number that you can enter in the field 'Swedish personal identity number'.
Note that all compulsory fields must be filled in before you can proceed with your application. If you leave a compulsory field blank, you will see a red box indicating that this field is required. The tab’s icon is a notification icon if compulsory data is missing, or your attention is needed.
The Home institution information is already pre-filled and comes from your nomination.
Now you need to fill in some general information about your exchange studies at Lund University.
Follow these steps:
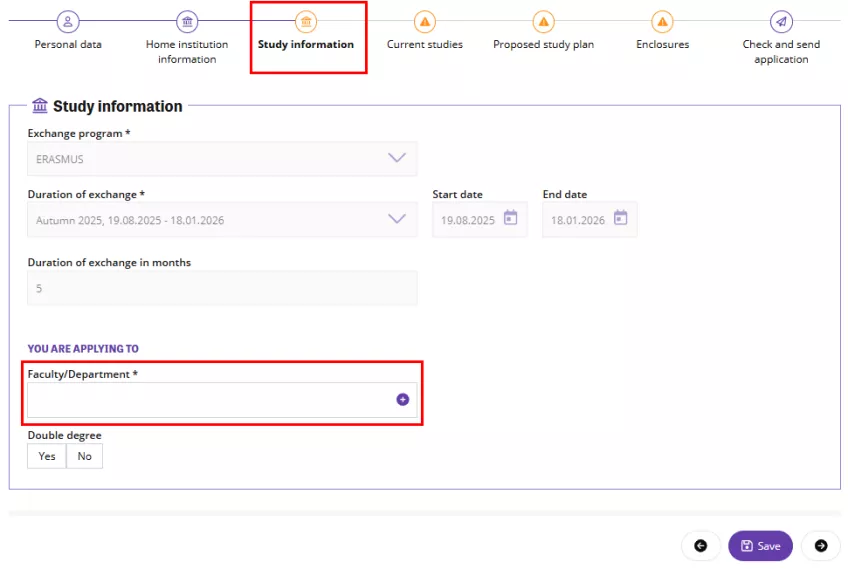
- Click on the 'Study information' tab.
- The exchange programme and duration of exchange information should already be pre-filled through the nomination process.
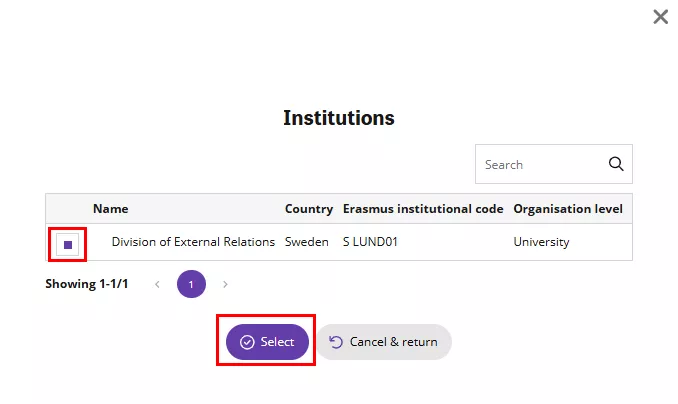
- Select a faculty/department. In most cases, you will only have one choice. If you are coming on a university-wide agreement, choose ‘Division of External Relations’, otherwise, choose the faculty you are nominated to. What you select in this field determines who will coordinate your exchange at Lund University, not which courses you can apply for.
- 'Double degree' should only be Yes if you are coming to Lund as part of a double degree agreement, not if you are doing a double major or double degree at your home university.
You will also need to provide some information about your current studies at your home university.
Follow these steps:
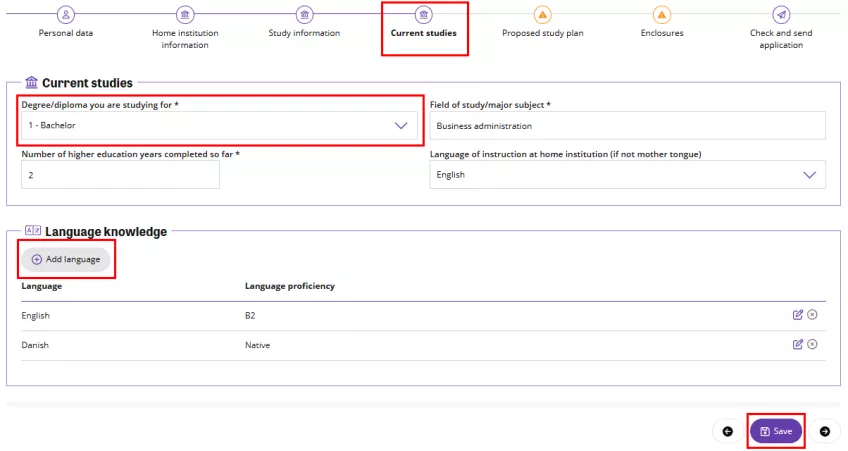
- Click on the 'Current studies' tab.
- Select the level of your current studies (degree/diploma you are studying for) if not already pre-filled by your home institution.
- Enter your field of study/major.
- Enter the number of years of higher education you have completed so far. This should include all years of Bachelor's and Master's studies completed before coming to Lund University.
- Select your language of instruction from the drop-down list.
- Enter at least your level of English by adding it under 'Language knowledge'.
The next step is to create your proposed study plan by selecting the courses you wish to take in order of priority.
Note that it can be difficult to make changes at a later stage, both before and on/after arrival (as Lund University does not have a formal add-and-drop period at the beginning of the semester). So please think carefully about your choice of courses, both when it comes to your 'main choice' courses and your 'alternative choice' courses (see below), before you complete your study plan in SoleMove.
To create your study plan, follow the steps below:
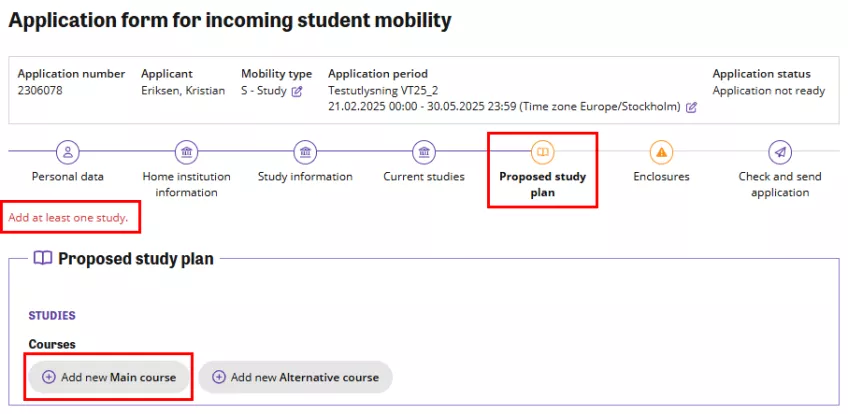
- Click on the 'Proposed study plan' tab.
- Click on 'Add new Main course'.
In order to submit your application, you have to add at least one course.
The instructions continue below the image.
Next, follow these steps:
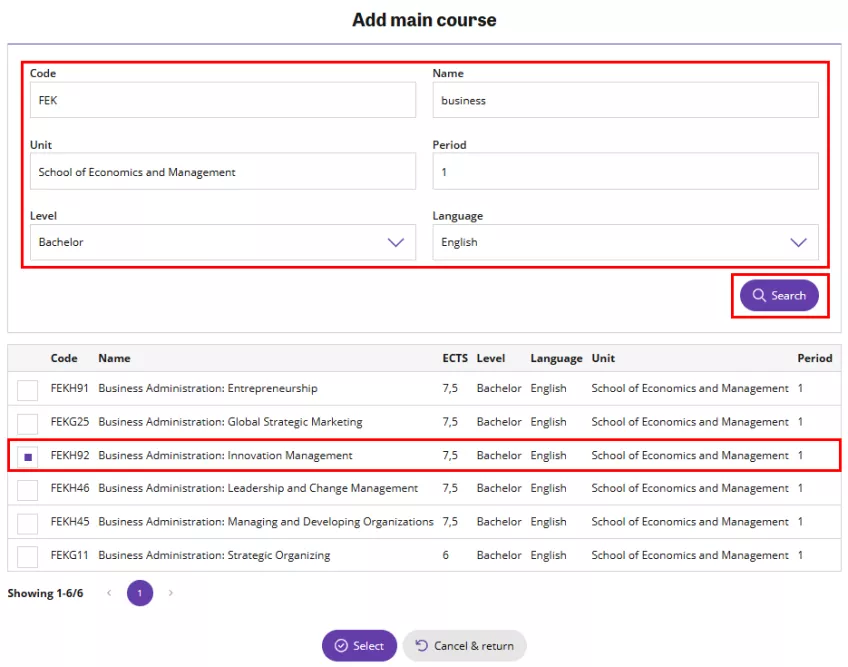
- Enter the code of the course you want to apply for, and add any other search criteria, e.g. Period. Click on 'Search'.
- Select the course you want to add. You can only select one course at a time.
- Click on 'Select'. The course is automatically added to the study plan.
- In order to add more courses, click on 'Add new Main course' and repeat the process until you have added all your main courses.
- Repeat the above steps in order to add alternative courses to your study plan – using the ‘Add new Alternative course’ button.
The instructions continue below the image.
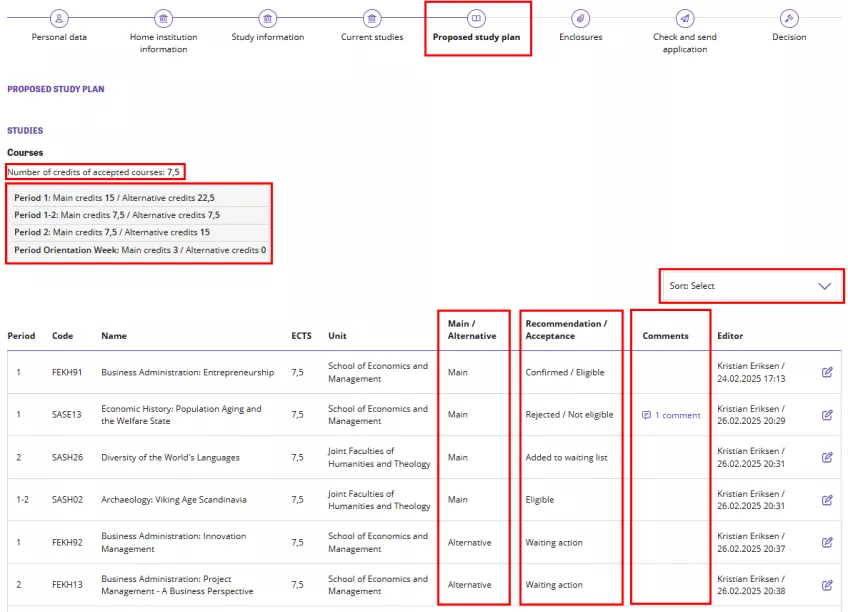
Note that the 'Period' column shows the start and end periods. If only '1' or '2' is displayed, the course is taught during a single period. If '1–2' is displayed, the course is taught the whole semester, during both periods.
You can only add a course once, the system will warn you if you already have the course in your study plan.
Note that it is recommended that you apply for at least two main courses and two to four alternative courses per period.
An alternative course will only be considered if you are not eligible for, or have not been accepted to, a main choice.
Check that you have a total of 30 ECTS credits for your main choices when you are finished. All other courses should be alternative courses.
Note that you can add, delete or edit your courses until you submit your application. However, courses cannot be deleted after you have been accepted to Lund University.
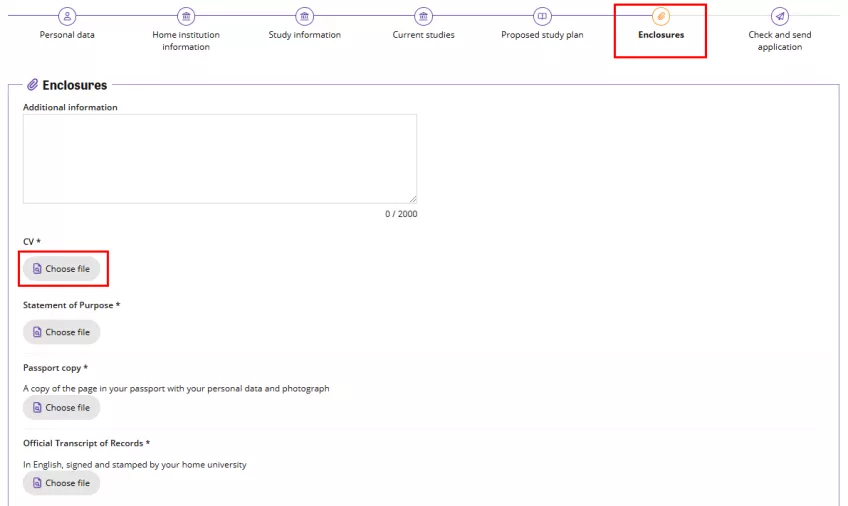
You will be asked to upload the required supporting documents to your application in the 'Enclosures' tab.
The file format should be .pdf or .doc/.docx – please do not upload .pages files. Photo file formats like .jpeg, gif or .png can be accepted for documents such as passport copies.
Visit the link below for details about enclosures:
Follow these steps to upload your supporting documents:
- Select 'Choose file' under the supporting document ('Enclosure') you want to upload.
- Select the correct file, and click on 'Open'.
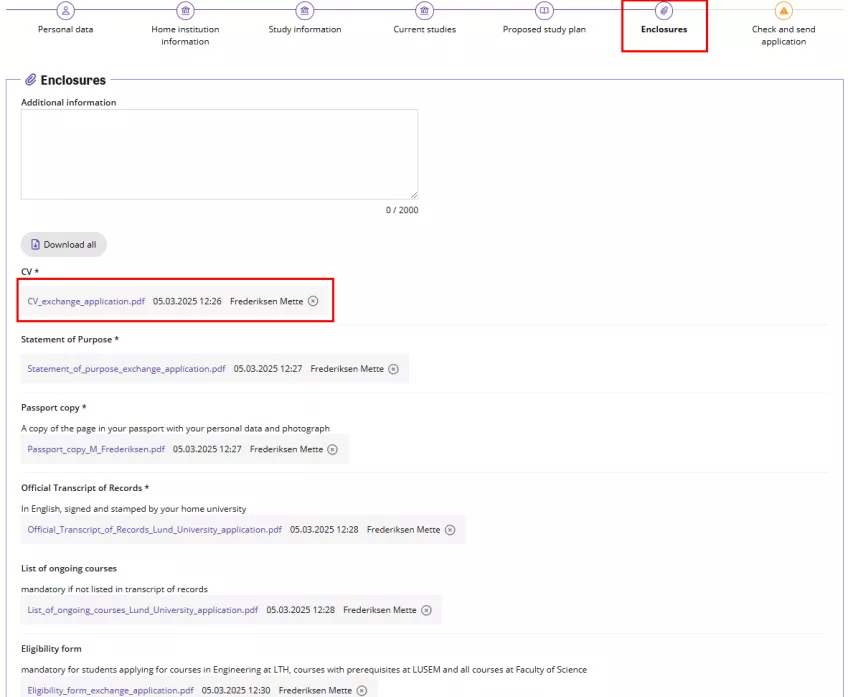
Repeat for all relevant enclosures.
Make sure to upload all compulsory enclosures depending on which faculty you will be taking courses at.
If you want to see an added file, select the file name. If you want to remove the added file, select the delete icon.
Submit your application
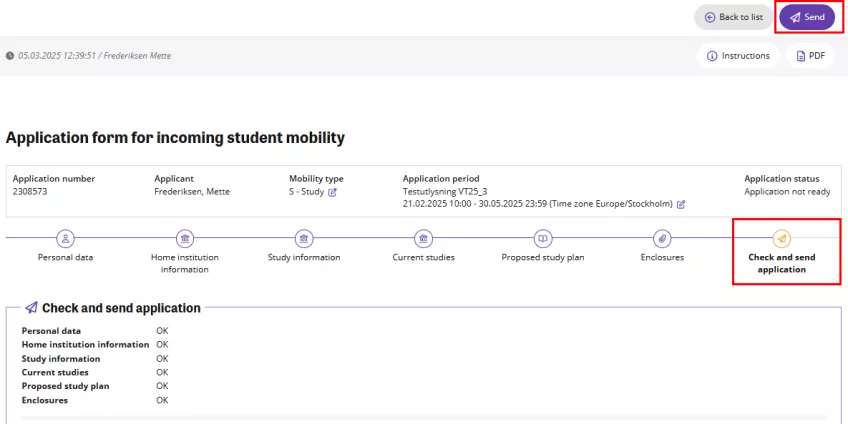
Check your application carefully. If you have completed all the compulsory fields and uploaded all the compulsory supporting documents, there should be no warning triangles left on the other tabs of your application.
The 'Send application' option should now be visible in the 'Check and send application' tab.
Follow these steps:
- Click on 'Send application' when you are ready.
- Click on 'Yes' when asked 'You can not edit the application after it has been sent. Do you really want to send the application?'.
Your application status will now change from 'Application not ready' to 'Application sent'.
Respond to your application result
Once you have been accepted, a new tab will appear in your application – the 'Acceptance' tab.
Please log in to SoleMove and confirm your exchange once you have decided to come to Lund University for the semester you have been accepted.
Once you have confirmed your exchange, you can also let us know when you plan to arrive in Lund.
Cancel your exchange (before the semester starts)
You can cancel your exchange at any time by logging into the application system and updating your status (even after confirmation). If you cancel your exchange, it is important that you also inform your international coordinator at Lund University by email so that this information can be updated in other systems too.
Cancel your exchange (after the semester has started)
If you cancel your exchange after the semester has started, you must also log in and deregister from your courses in 'Ladok for students'.
The course review process is usually completed by mid-to-late May (for the autumn semester) and mid-December (for the spring semester). This means that, even after you receive your 'Letter of Acceptance', there is no guarantee that you will get the courses you have applied for.
You can check your course status by logging in to SoleMove. Here is a list of the different statuses and what they mean:
- Confirmed – you are eligible and have been admitted to the course
- Rejected – the course is full/you are not eligible/you already have a full study plan
- Withdrawn – you no longer wish to take the course/the course is not approved by your home university
- Added to waiting list – the course is currently full, but you have been placed on the waiting list. If you no longer wish to take the course, please inform your coordinator.
- Pre-selected – this is not a 'Confirmed' status, it is only used during the admissions process. The status will change to either 'Confirmed' or 'Rejected'.
- Waiting action – this course has not yet been processed. If courses are still listed as 'Waiting action' at the end of the admissions process, they are usually not main choices and will not be processed unless you specifically ask to make the course a higher priority.
Contact information
If you have any questions about your application in SoleMove, please contact solemove [at] er [dot] lu [dot] se (solemove[at]er[dot]lu[dot]se).
